I have new rocket videos that have not been edited yet and new rocket engine tests as well but this is our busy time of the year for video and writing work so these things may have to wait until next spring before I can post them.
How many of you have ever built and flown an Estes rocket? I began building and flying them when I was 12 years old. My first one was called the Wac Corporal. It was small but would take a wide range of engines. It could pass 400 mph in the first 70 feet. My dad launched it for me in the north corn field on grandpa's farm. He turned to touch the wires to the battery and when he turned back to watch the rocket take off it was all ready long gone.
Since then I've had a fascination with rocketry and some in the area of pyrotechnics. Working with dad on construction I sometimes worked with dynamite to straighten and deepen ditches when it was cheaper and easier to blast than it was to bring the dragline back in and dig on it for $55 per hour. Back then we could go to the Farmer CoOp and buy anything we needed for blasting without any questions asked. Everyone knew we worked construction and dad nearly always had a case of some kind of dynamite in the utility room in the corner of the barn on the farm.
We did blasting with dynamite and some with ammonium nitrate mixed with diesel fuel. We would mix it in a big wash tub and put it into little plastic baggies. We would touch it off with a quarter stick of dynamite and blasted trees that were so big you could have driven the bulldozer off into them covered it up and never known it was there. Trees so huge we had to cut the limbs in sections just to drag them off with a TD-18 dozer.
One Fourth of July while playing with relatives in the farm yard I had a firecracker go off in my hand and learned first hand that's a bad thing. Those little fuses can't be trusted to be the same from one cracker to another so I stopped lighting and throwing them from that moment on. Better quality fuses like those used on the M-60's and M-80's back then were safe to light and throw despite the fact they warned against it. You might imagine that if a small firecracker sent me to the doctor what a big one might do to a person's hand.
Years later I got married and moved to where we live now and we still liked to fly the Estes rockets now and then. While most of my work was of a physical nature or operating machines or SCUBA work my mind loved to solve puzzles. I enjoyed designing and building things and while you could buy rocket engines it was more challenging to make them from scratch. My first attempts at making black powder were not so good but they were good enough to explode in my back yard. I didn't realize that BP rockets needed to have the fuel compressed in order to control the burn rate. I figured that out real quick but all I could do was put my engine under the truck and jack it up with a rod in it to compress the BP. The BP being low quality was just good enough to get off the launch pad, fall over and set the field on fire. Not that we hadn't had to put out field fires in the past for using Estes engines, but I highly recommend taking this into account before lighting a rocket of any kind.
The manuals for making BP would give you the ratio and some idea how to make it but seemed to be leaving out important techniques. After trying several times over a few weeks I finally gave up thinking it wasn't possible. I had to buy my chemicals from stores in small quantities at higher than reasonable price for what I was using it for. We had no Internet or access to such things from other places.
Years later and now with the Internet I bought some new chemicals and made a new batch using the US Army Improvised Munitions manual technique for making black powder. Though I made my own charcoal out of fallen maple limbs in the back yard it was about 10 times better than my previous attempts years ago. I had hope now of getting it right if I could only find the secret. I ordered some air fluff charcoal from a place online and we tried again. Our third batch was so much better than anything I had made I decided I would try it in a rocket. It flew but not as well as I wanted. I tried it in my BP pistol and one round worked and the other didn't. We made batch 4 and it was enough better than 3 that my rocket actually flew.
Please note the military manual for making black powder in the field considers the soldier will not have scales and this is why it is done by volume instead of by weight. Measuring by weight in grams is the more accurate method and produces a better powder by the same method I'm using.
I will post our mix on here in PDF.
I started by making the first engines in my bench vice using it to compress the BP and clay for nozzles. It was very primitive but it worked. I used wooden dowel rods to compress the engine in the vise. I would take a drill bit and literally drill out the nozzle usually by hand. The rockets were promising and gave me hope. I began to build more realizing I needed a vertical press I made one. I woke one morning with the plans in my head and instantly began putting those ideas to work in the barn. The addition of a 4 ton hydraulic jack and 5 valve springs from a 350 chevy engine were key elements in the press. I've tested this press and can see the springs at max compression are pushing over 300 lbs. When they hit the end any more pumps on the handle cause boards to crack.
I've learned this is enough pressure for batch 6 which is the best powder I've made and used in rocket engines. I made batch 7 with red gum which isn't as good of rocket fuel but does add a nice red spark to the fuel mix and flies well in the rockets. Highly visible at night thanks to the red sparks. I made batch 8 recently by myself and changed the technique a little bit. I did a burn test and I'm inclined to say it's at least as good as batch 6 and possibly better. Information about these batches are in the PDF file there's a link on the left side of the page.
I intend to put up pictures and add to this page as I can. For now enjoy the videos and check back now and then for updates.
How many of you have ever built and flown an Estes rocket? I began building and flying them when I was 12 years old. My first one was called the Wac Corporal. It was small but would take a wide range of engines. It could pass 400 mph in the first 70 feet. My dad launched it for me in the north corn field on grandpa's farm. He turned to touch the wires to the battery and when he turned back to watch the rocket take off it was all ready long gone.
Since then I've had a fascination with rocketry and some in the area of pyrotechnics. Working with dad on construction I sometimes worked with dynamite to straighten and deepen ditches when it was cheaper and easier to blast than it was to bring the dragline back in and dig on it for $55 per hour. Back then we could go to the Farmer CoOp and buy anything we needed for blasting without any questions asked. Everyone knew we worked construction and dad nearly always had a case of some kind of dynamite in the utility room in the corner of the barn on the farm.
We did blasting with dynamite and some with ammonium nitrate mixed with diesel fuel. We would mix it in a big wash tub and put it into little plastic baggies. We would touch it off with a quarter stick of dynamite and blasted trees that were so big you could have driven the bulldozer off into them covered it up and never known it was there. Trees so huge we had to cut the limbs in sections just to drag them off with a TD-18 dozer.
One Fourth of July while playing with relatives in the farm yard I had a firecracker go off in my hand and learned first hand that's a bad thing. Those little fuses can't be trusted to be the same from one cracker to another so I stopped lighting and throwing them from that moment on. Better quality fuses like those used on the M-60's and M-80's back then were safe to light and throw despite the fact they warned against it. You might imagine that if a small firecracker sent me to the doctor what a big one might do to a person's hand.
Years later I got married and moved to where we live now and we still liked to fly the Estes rockets now and then. While most of my work was of a physical nature or operating machines or SCUBA work my mind loved to solve puzzles. I enjoyed designing and building things and while you could buy rocket engines it was more challenging to make them from scratch. My first attempts at making black powder were not so good but they were good enough to explode in my back yard. I didn't realize that BP rockets needed to have the fuel compressed in order to control the burn rate. I figured that out real quick but all I could do was put my engine under the truck and jack it up with a rod in it to compress the BP. The BP being low quality was just good enough to get off the launch pad, fall over and set the field on fire. Not that we hadn't had to put out field fires in the past for using Estes engines, but I highly recommend taking this into account before lighting a rocket of any kind.
The manuals for making BP would give you the ratio and some idea how to make it but seemed to be leaving out important techniques. After trying several times over a few weeks I finally gave up thinking it wasn't possible. I had to buy my chemicals from stores in small quantities at higher than reasonable price for what I was using it for. We had no Internet or access to such things from other places.
Years later and now with the Internet I bought some new chemicals and made a new batch using the US Army Improvised Munitions manual technique for making black powder. Though I made my own charcoal out of fallen maple limbs in the back yard it was about 10 times better than my previous attempts years ago. I had hope now of getting it right if I could only find the secret. I ordered some air fluff charcoal from a place online and we tried again. Our third batch was so much better than anything I had made I decided I would try it in a rocket. It flew but not as well as I wanted. I tried it in my BP pistol and one round worked and the other didn't. We made batch 4 and it was enough better than 3 that my rocket actually flew.
Refined Process for Black Powder
I've refined my technique in making black powder and grind and sift through fine screen until all particles are tiny. This way they mix much faster and better when being cooked/processed. We still use the standard formula but the technique is also very important to making good black powder. I turned the burner down to 4-4.5 and slow cook it sometimes allowing it to set for a few seconds at a time allowing the heat to build up under the 'crust' then stir again. Eventually it will begin to boil and tiny bubbles will come up forming bulges on the crust. Stir again. I did this for awhile until the tiny bubbles were coming up much faster then I processed it according to the military manual as I have all the batches previously.Please note the military manual for making black powder in the field considers the soldier will not have scales and this is why it is done by volume instead of by weight. Measuring by weight in grams is the more accurate method and produces a better powder by the same method I'm using.
I will post our mix on here in PDF.
I started by making the first engines in my bench vice using it to compress the BP and clay for nozzles. It was very primitive but it worked. I used wooden dowel rods to compress the engine in the vise. I would take a drill bit and literally drill out the nozzle usually by hand. The rockets were promising and gave me hope. I began to build more realizing I needed a vertical press I made one. I woke one morning with the plans in my head and instantly began putting those ideas to work in the barn. The addition of a 4 ton hydraulic jack and 5 valve springs from a 350 chevy engine were key elements in the press. I've tested this press and can see the springs at max compression are pushing over 300 lbs. When they hit the end any more pumps on the handle cause boards to crack.
I've learned this is enough pressure for batch 6 which is the best powder I've made and used in rocket engines. I made batch 7 with red gum which isn't as good of rocket fuel but does add a nice red spark to the fuel mix and flies well in the rockets. Highly visible at night thanks to the red sparks. I made batch 8 recently by myself and changed the technique a little bit. I did a burn test and I'm inclined to say it's at least as good as batch 6 and possibly better. Information about these batches are in the PDF file there's a link on the left side of the page.
I intend to put up pictures and add to this page as I can. For now enjoy the videos and check back now and then for updates.
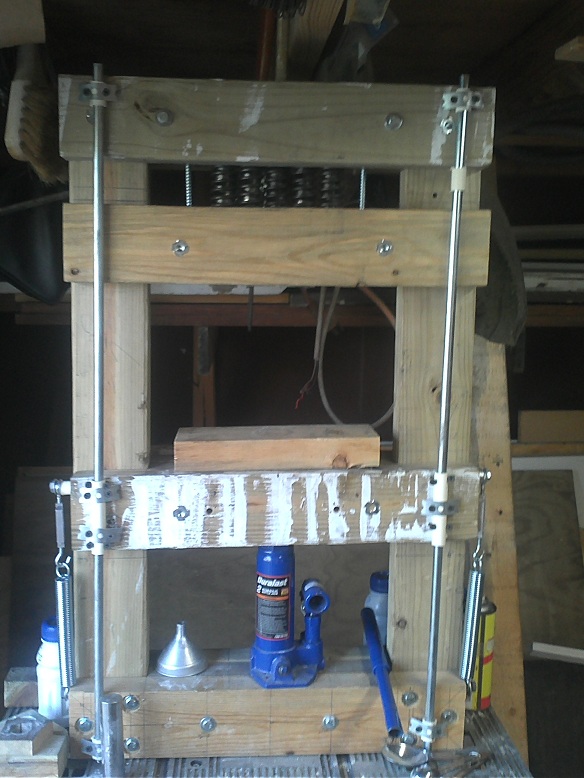
Creative types tend to have their brains solving problems continually even when we are asleep. I needed a rocket engine press and realized I could buy a hydraulic press for about $80-$100 but it wouldn't be exactly what I wanted. I would need to make modifications. Sure I could have come up with the money but I had a pile of 2x4s in the barn and when I woke one morning the plans for this press were in my head. I may have $40 total in it and Kevin and I built it ourselves. I showed him what I wanted and we both went to work to build it. It's not perfect but it works. I'm sure I could build another one and resolve the little problems this was has.
Please notice my solution to judging pressure and preventing over pressuring the engines is a set of 5 Chevy 350 valve springs I got for free at a local engine rebuilder shop. I'm not sure what max pressure actually is but it's somewhere between 350-400 lbs before the springs are completely compressed and the boards begin to pop. If I were doing this over I would put 6 springs in it but so far the 5 are working well.
You can click on the pictures to get a better view.
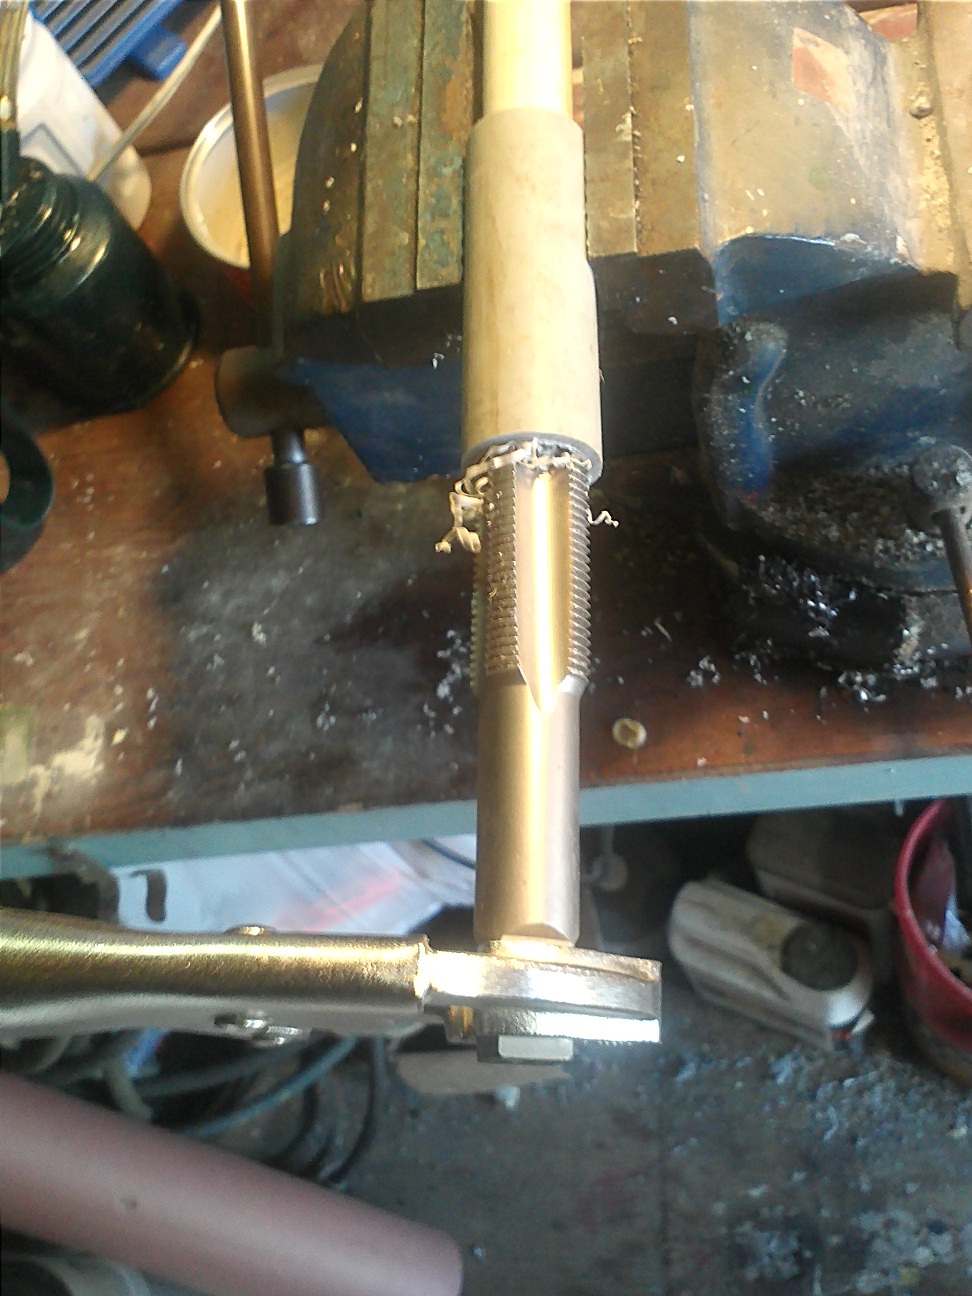
This is a 3/4" ID electrical conduit PVC pipe about three inches long. This is the vise I used to compress my first 1/2" engines in.
I switched from cat litter clay to Bentonite Clay used by fireworks makers and this also helped resolve blowing nozzles.
I switched from cat litter clay to Bentonite Clay used by fireworks makers and this also helped resolve blowing nozzles.
Once I was able to make fast burning black powder I began blowing nozzles. On one of our trips using batch 4 nearly all of our rockets blew one end or the other shooting fireballs into the sky. It was quite impressive but also very disappointing. People were cheering and I was saying "It wasn't suppose to do that."
1 I was using granular cat litter clay. I began grinding it to dust before pressing it into the case. This helped but did not completely fix the problem.
I realized the clay needed something to grip onto inside the engine case and I wanted something that I could use as many times as necessary without costing me anymore. One guy said just buy a coupler for the nozzle in each engine and I said "that would be a continual expense." My solution to that problem was a tapper. I began threading both ends of the engine cases and that helped greatly, until my powder became even faster and I began blowing these with a nice loud bang about 100' in the air.
The cause of course is "over-pressure" inside the engine case. The solution can be a combination of things. With two rockets exactly the same as two others that exploded in flight I simply drilled the nozzles out larger. These two went supersonic in a blink and you can see them in the video.
Another way to control engine case pressure is by making the fuel core smaller changing the way the fuel burns inside the case. The third way is by doing the burn control thing I describe in the PDF file on the link above to the left.
This engine test was done while the tester still had a crooked wooden dowel in the center. The slider hung up on the dowel and didn't give a correct reading. This is why I changed to the steel rod instead.

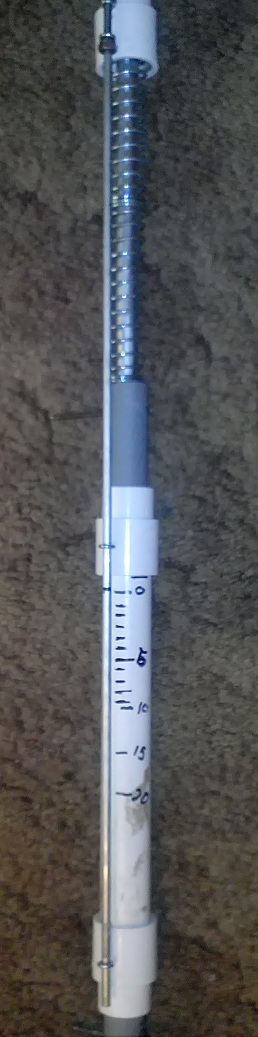
Another thing a rocket scientist can't live without is a working engine tester! :-)
In order to make good dependable engines you must find consistency. To find consistency you need to know what kind of power your engines are producing. If you make a change in the fuel or any part of the engine design you need a way to test it so you will have some idea if that change was a good idea, or not.
Once again I woke up one morning and realized simple is better and less is more. I didn't want to spend a lot of money on an engine tester but I wanted something that worked. My solution was a steel bar with two springs a few pipes and a scale which I calibrated and marked according to another scale by pressing down on the engine holder at the top and marking the pounds on the white segment you see here.
At the top I have adapters that are used to fit the engines and by changing the adapter I can fit 1/2', 3/4" to 1" engines that I currently make. The tester goes all the way to 20 pounds and could be used on 1.5" to 2" engines I'm fairly sure. If the engine was so powerful it put out more than 20 lbs of thrust all you need to do is change to a more powerful spring set. The design is simple enough it would be very easy to build a tester for just about any engine size a hobbyist might want.
I drive or push the bottom of the steel shaft into the ground, put the engine in the top pointing down and light'er up. I use two cameras one focused on the scale and the other I wear on my head, it's a GoPro. Then I can watch the video and can see what my engines do.
The one thing I want to add to this is a analog to digital (USB) interface. I've found some IC chips that might work but I don't have any programming software for my PC to create a program that would read the sensor.
A simple potentiometer connected to the digital interface then being read by a computer program would be the way to go. If anyone has any idea where I can get something like that please E-mail me.